Virtual Machine Infrastructure
The virtual machine infrastructure consists of four components used to manage your NETLAB+ system virtual machine environment. The components are described below, including guidance on referencing our library of documentation resources.
Virtual Datacenters and Management Agents
Define the virtual datacenters that contain your virtual machines and management agents used to broker NETLAB+ automation requests.
Adding a Virtual Datacenter in NETLAB+
In this section, you will add your Proxmox VE datacenter created during the Virtual Machine Infrastructure setup to NETLAB+.
Login to the NETLAB administrator account.
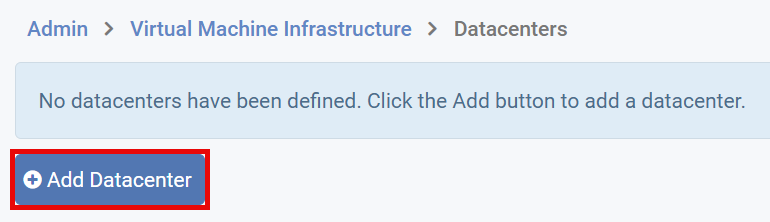
Click on > Virtual Machine Infrastructure.
Click on Virtual Datacenters and Management Agents.

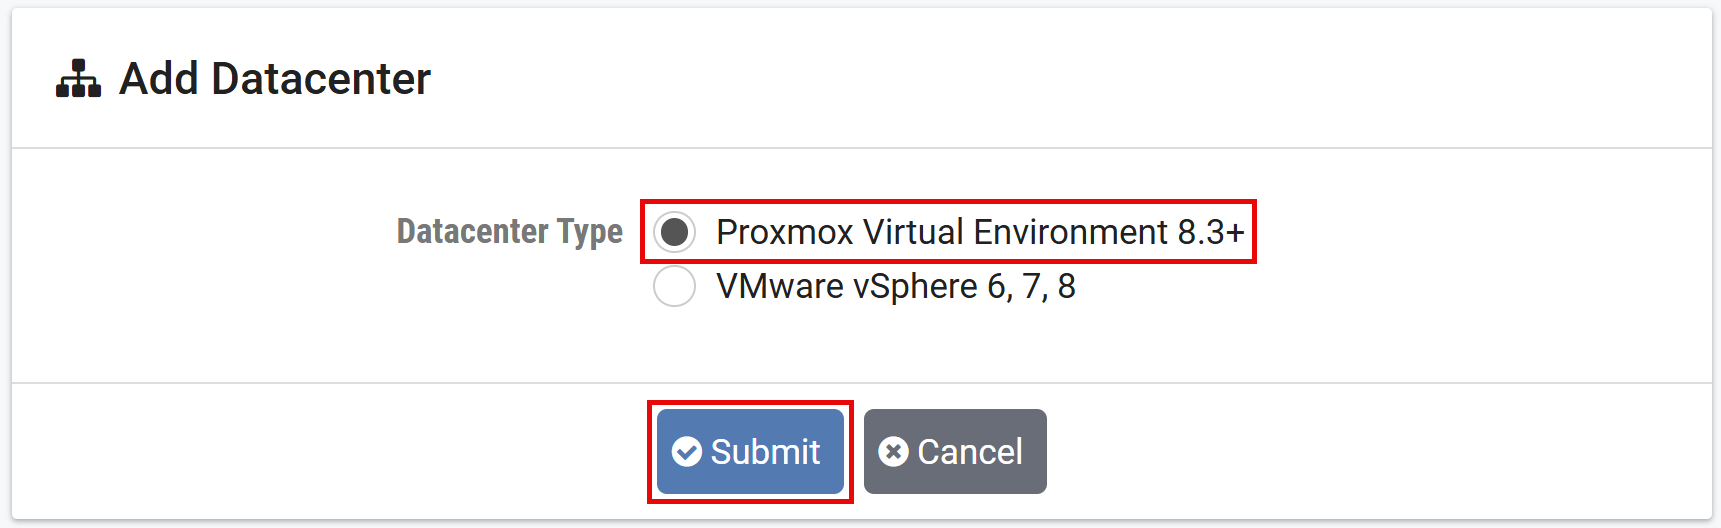
Click on Add Datacenter.
On the Add Datacenter page, select Proxmox Virtual Environment 8.3+, then click the Submit button.
Enter the required information for the datacenter you have set up. Field descriptions are provided below. Click the Submit button.
Field Descriptions
- Cluster Name:
The exact name of the cluster as registered in the Proxmox.
- Management Hostname:
The hostname or IP address that will be used by NETLAB+ to connect to the Proxmox API. This is usually the cluster node designated as the NETLAB+ management server.
- Username:
The username that will be used to connect to the Proxmox API. This is currently limited to Linux/PAM authentication.
- Password:
The password that will be used to connect to the Proxmox API. This is currently limited to Linux/PAM authentication.
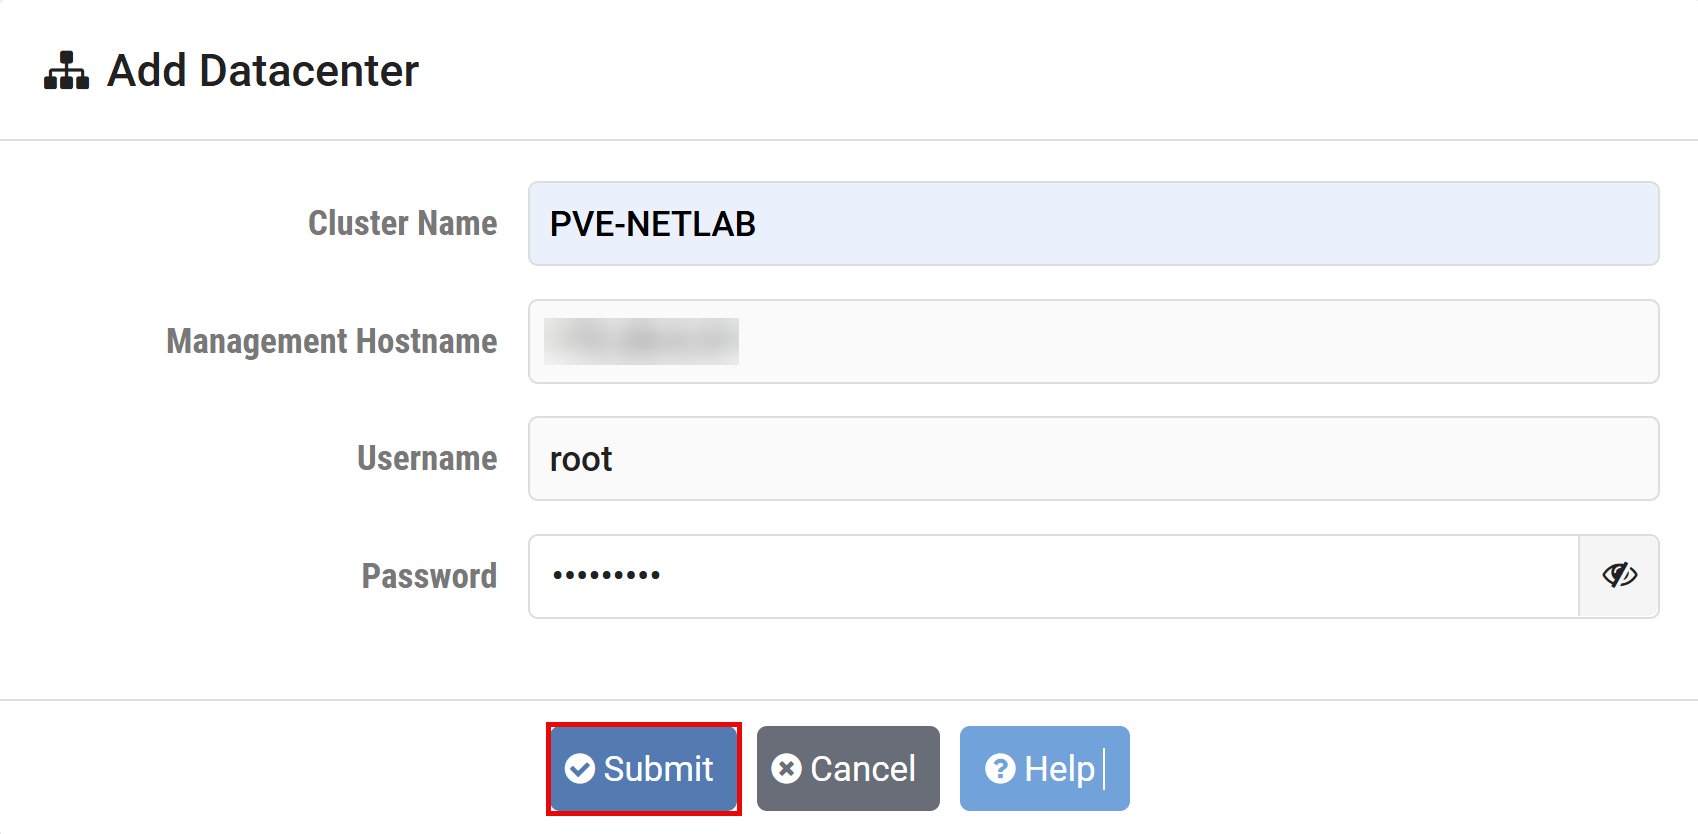
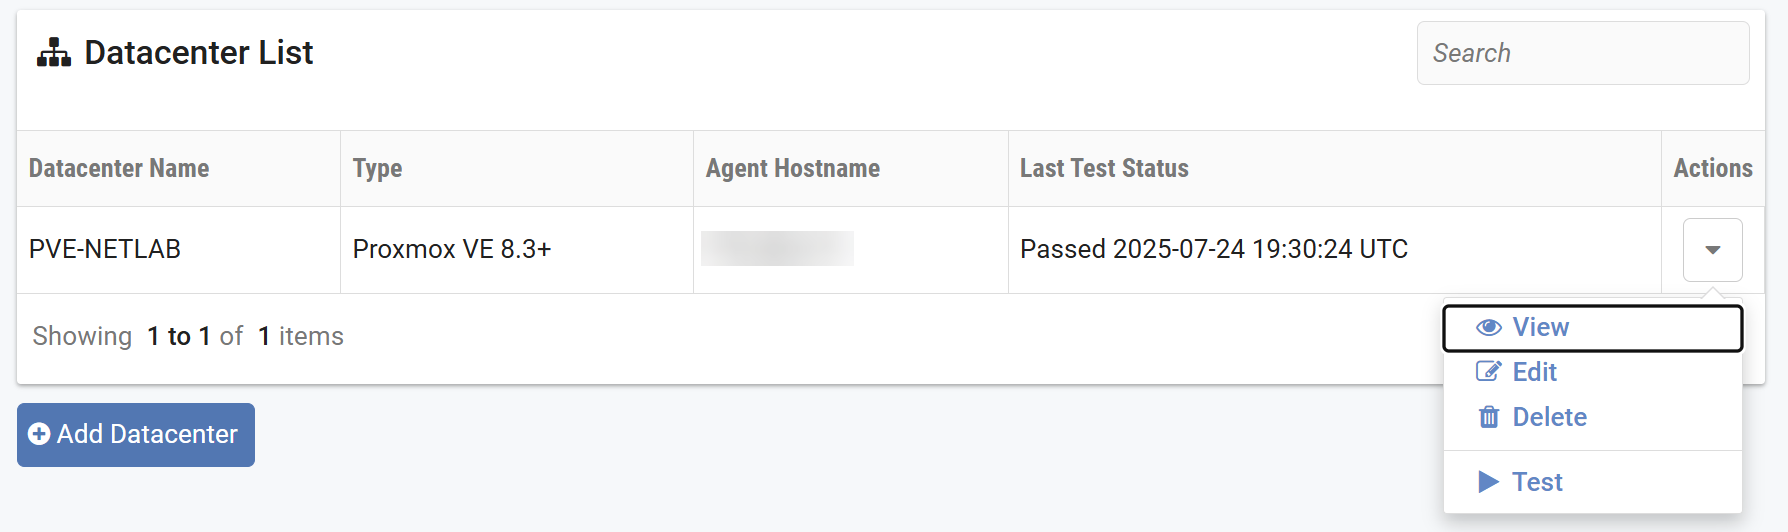
Click on OK to continue.
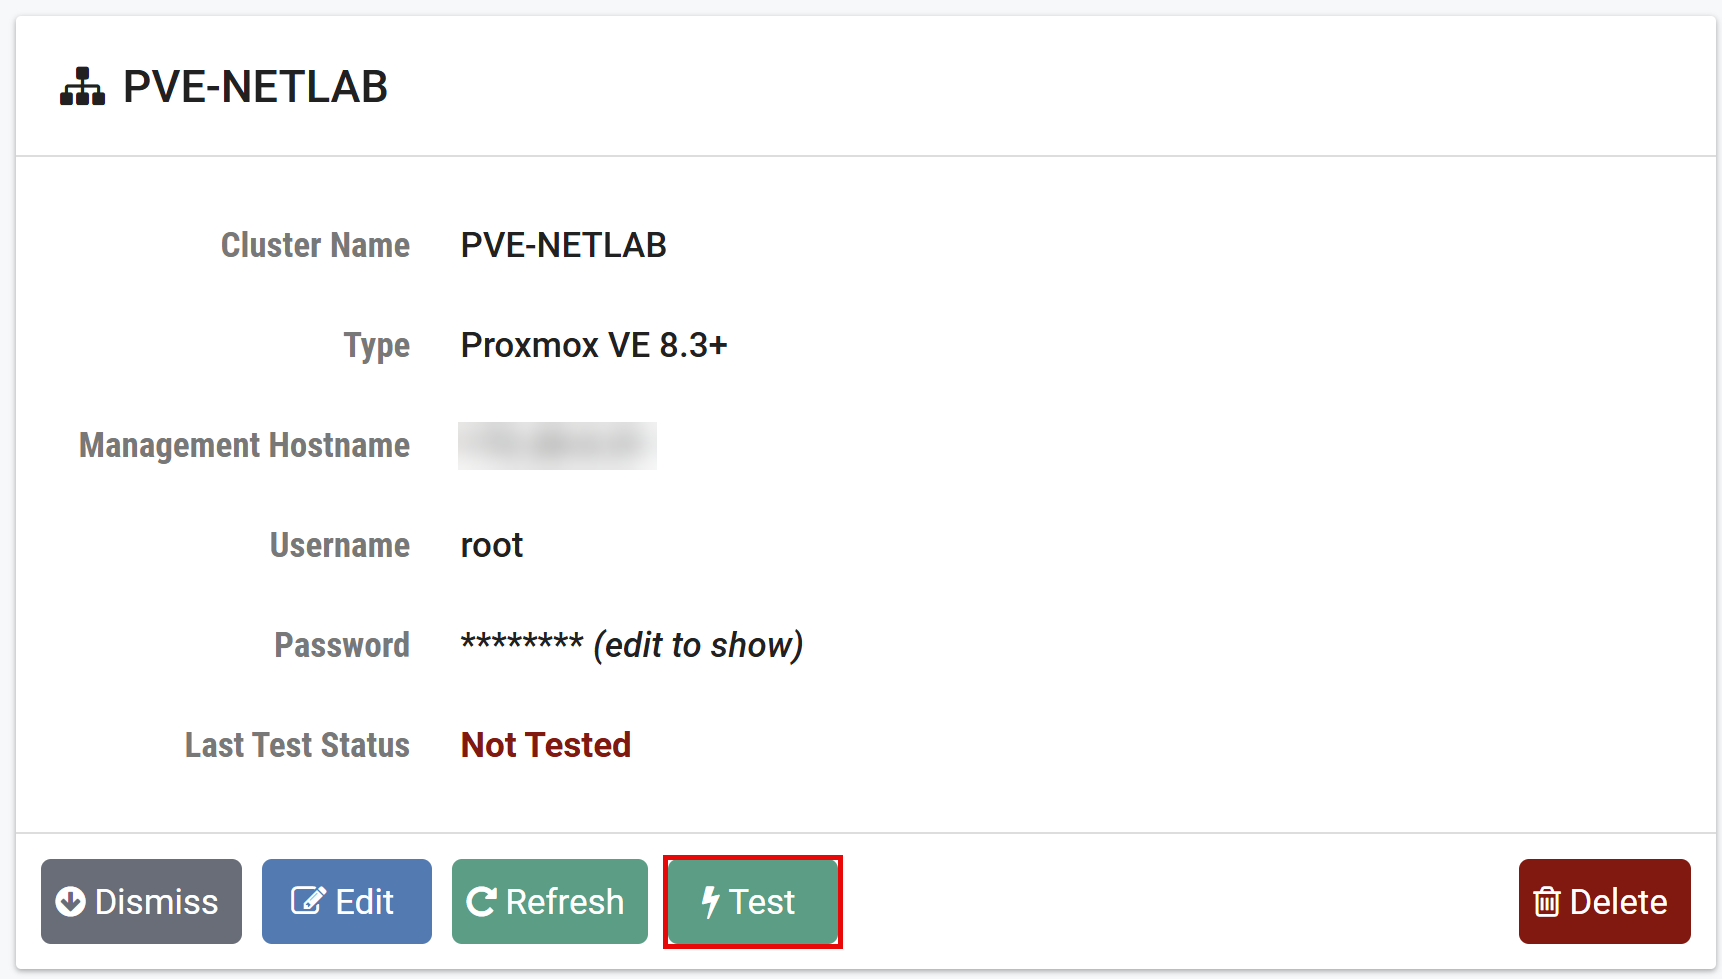
Click Test to verify that NETLAB+ can connect to Proxmox VE cluster using the settings
you provided. If the test fails, recheck connectivity and your datacenter settings.
Click on OK to continue.
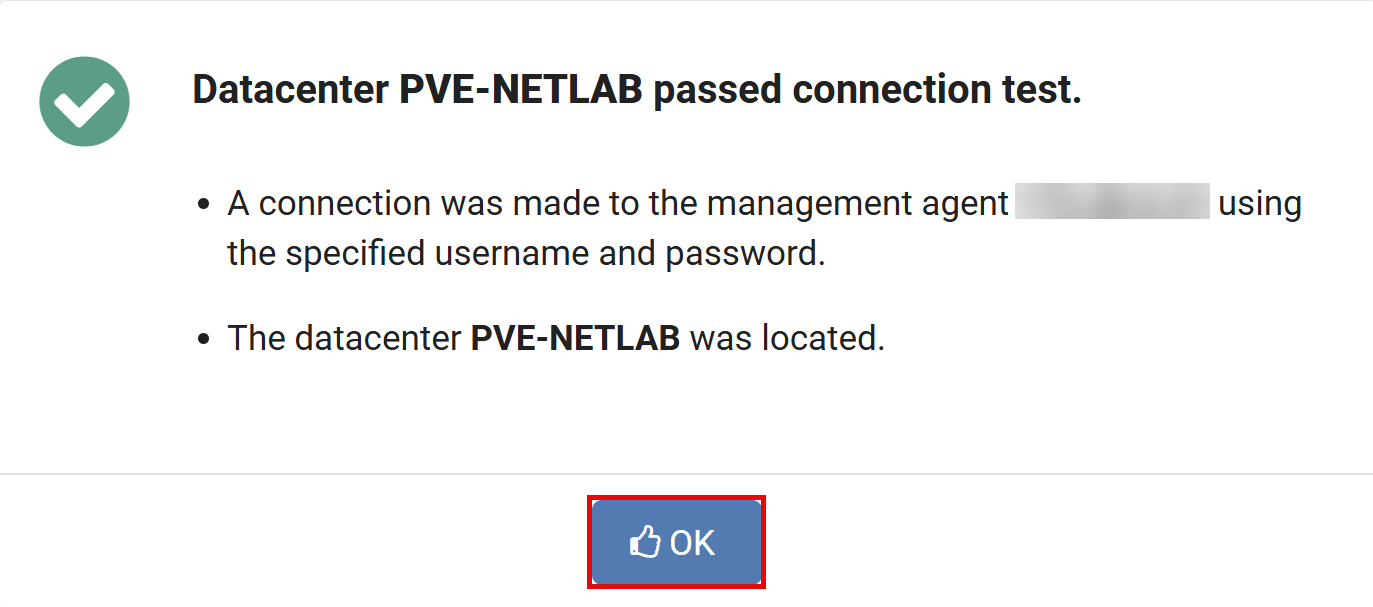
Click Dismiss to return to the datacenter list.
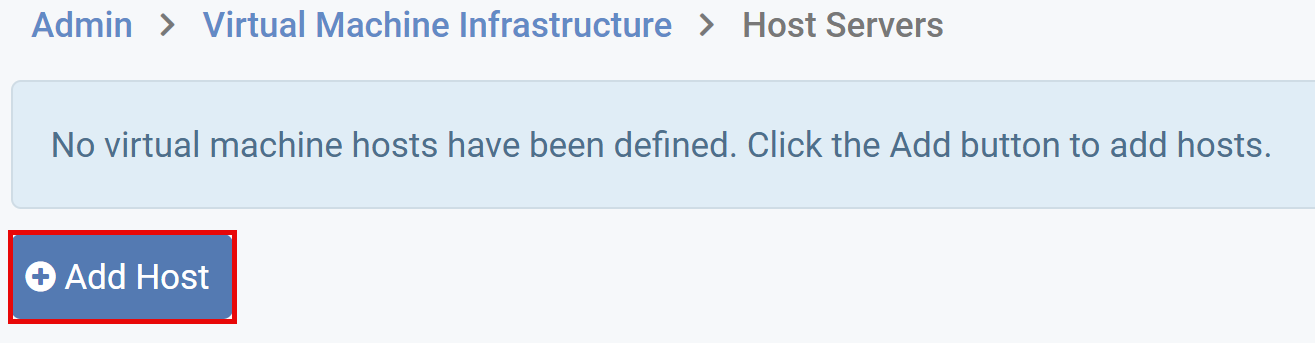
Virtual Machine Host Servers
Define the virtual machine host servers in your datacenter that are available to NETLAB+.
As of version 25.1.0, the host server view displays information about
NETLAB+-created Proxmox host networks. This allows administrators to
inspect the network topology that NETLAB+ has configured on each host without
requiring SSH access. NETLAB+ manages these networks directly on Proxmox hosts
via SSH (see advisory D1428); the network files are located in
/etc/network/interfaces.d/nlb* on each host.
Adding Virtual Machine Host Servers
In this section, we will add the virtual machine host servers in your datacenters to NETLAB+.
Login to the NETLAB administrator account.
Click on > Virtual Machine Infrastructure.
Click on Virtual Machine Host Servers.

Click on Add Host.
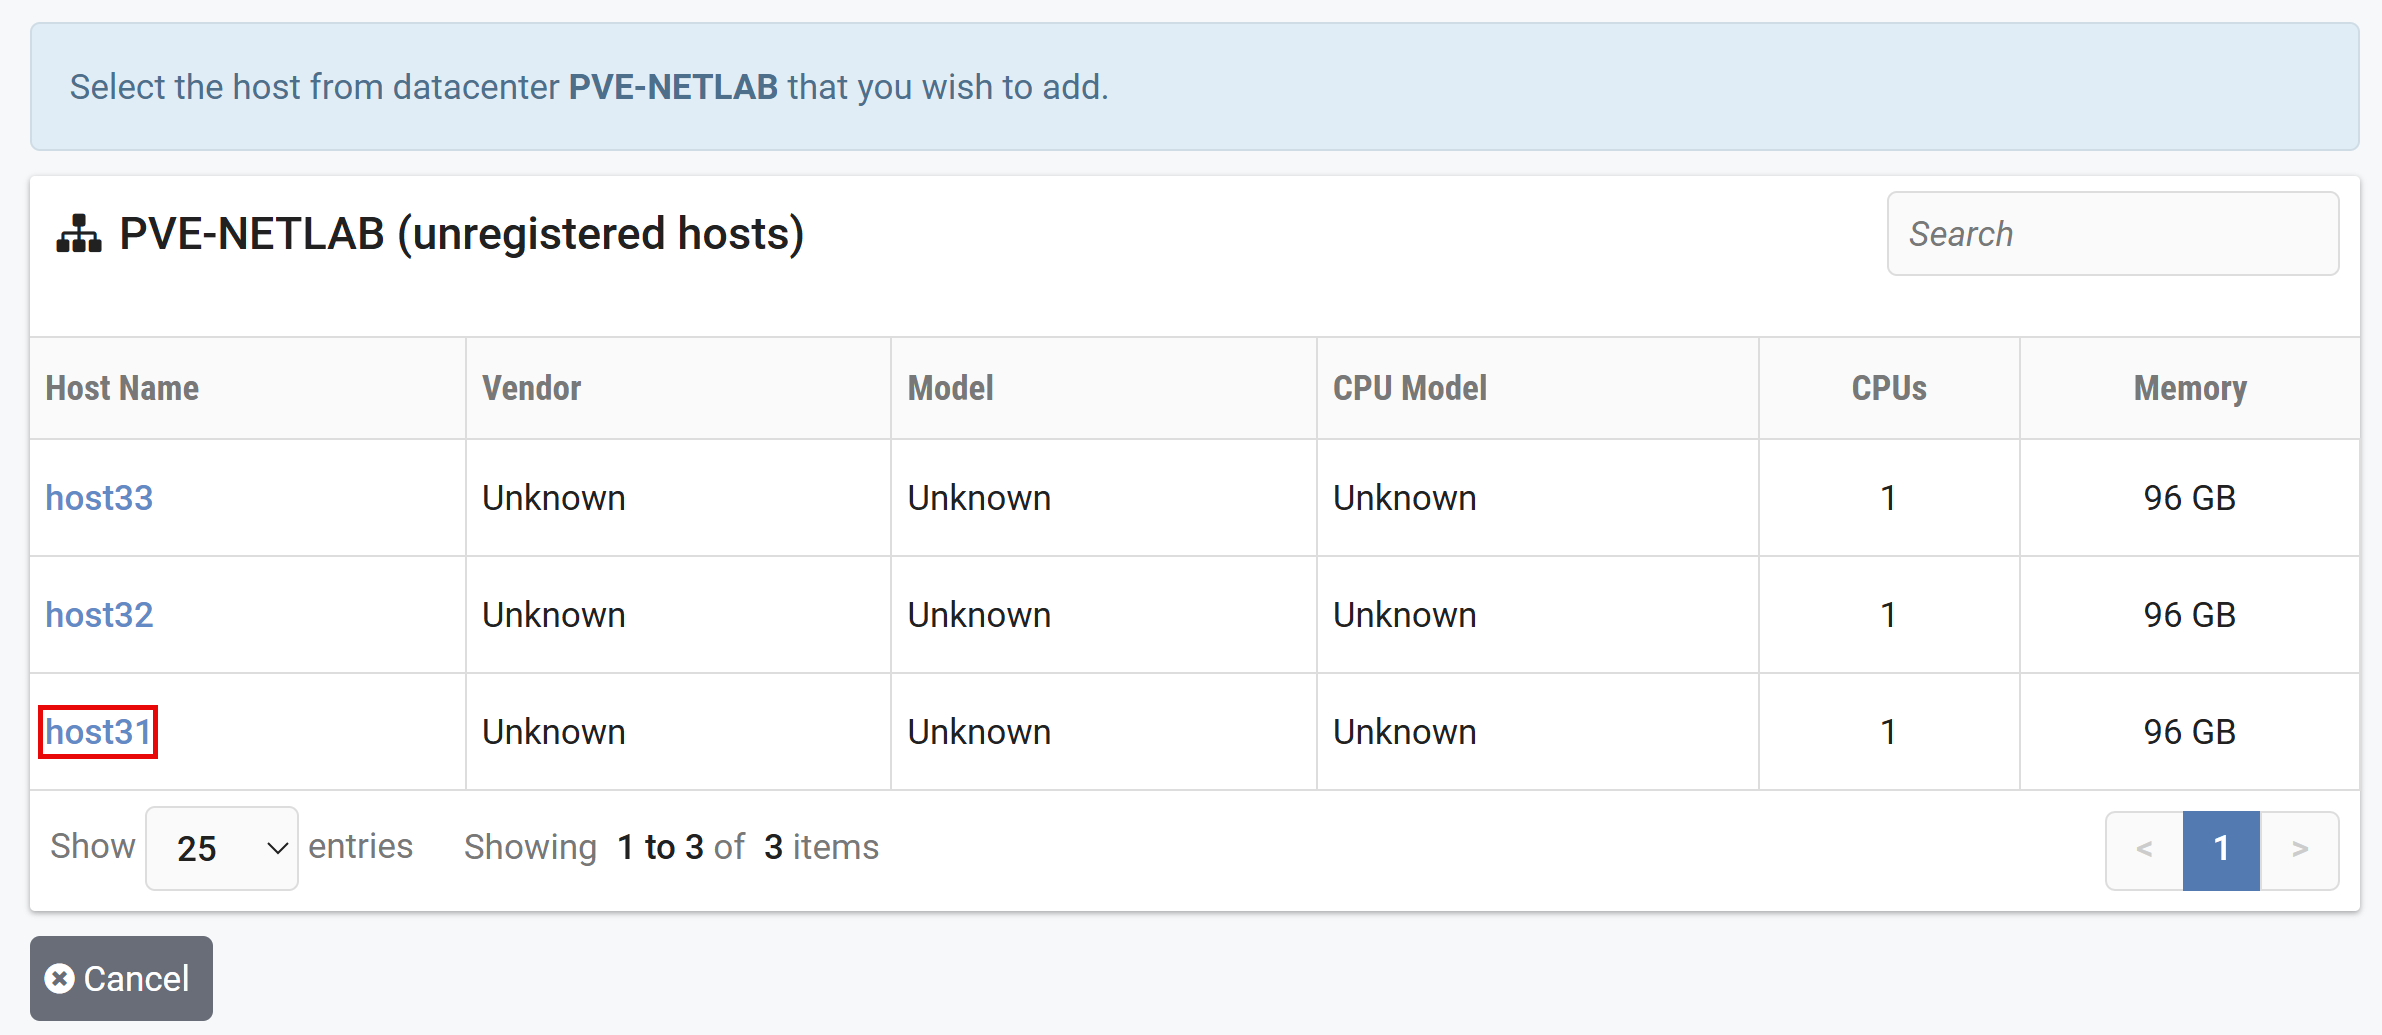
NETLAB+ scans the datacenter to discover hosts. Hosts that have not been registered in NETLAB+ are displayed. Select the host you wish to add by clicking on the host name.
Enter the settings for this host. See Field Descriptions below. Click the Submit button.
Field Descriptions
- Host Name:
The name of the host EXACTLY as it appears in the management agent. This can be a host name, full qualified domain name, or IP address.
- Datacenter Name:
The name of the datacenter is displayed in this field.
- Outside IP Address:
The IP (version 4) address of the network interface on this host that is reachable by the NETLAB+ outside network interface. These interfaces are usually connected to a campus LAN segment. You may leave this blank if you want NETLAB+ to communicate with this host over the NETLAB+ inside network (i.e., control switch).
- Inside IP Address:
The IP (version 4) address of the network interface on this host that is reachable by the NETLAB+ inside network interface. Inside interfaces connect to ports on the NETLAB+ control switch. IP addresses designated for inside host interface are in the 169.254.0.X range. An inside interface and IP address is required on this host when connecting to a NETLAB+ control switch (for VMs interacting with real lab equipment).
- Inside vSwitch Name:
The name of the virtual switch that has an uplink port to a control switch on the inside network. This is should be
NLCONTROL. This value is required to enable automatic networking of virtual machines in real equipment pods. If blank, automatic networking for real equipment pods will not occur.- Host Network:
Select the option of Outside Network or Inside Network. The network will be used to communicate between the NETLAB+ server and this host server. The outside network is recommended.
- Prefer MKS Viewer:
See the MKS Viewer for details.
Note
This does not pertain to Proxmox VE and should be left unchecked.
- Proactive Resource Awareness:
See the Proactive Resource Awareness for details.
Click OK to confirm the host has been added.
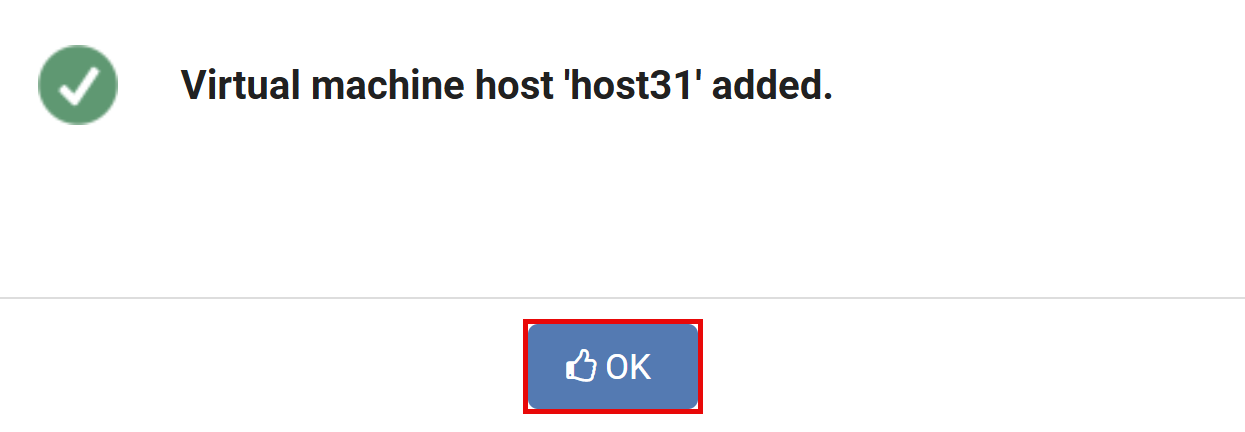
Click Dismiss to return to host list.
Repeat this section for each Proxmox VE host in your Virtual Machine Infrastructure.
MKS Viewer Considerations and Troubleshooting
Danger
This section is here for reference to VMware infrastructure and does not apply to Proxmox VE.
As mentioned in the previous section, the option to use the more advanced MKS (mouse, keyboard, screen) viewer, replacing the VNC viewer, is available for host servers running ESXi 6.
The option to select the MKS viewer is available for hosts running ESXi 6 only. If the host is running ESXi version 7 or higher, NETLAB+ will always use MKS (as VNC is no longer supported as of version 7). NETLAB+ will use VNC if the host is running ESXi version 5 and lower.
Selecting the MKS viewer provides the advantage of the ability to resize the desktop to match the client display area, allowing a full-screen display for single-user reservations (instructors and students). Lab reservations for instructor-led training or team reservations do not include this capability.
VMware tools and desktop resizing capability are required on the guest operating system. A solid, one-color background should be selected for the VM. A desktop background image or a gradient color selection will result in very slow screen updates and consume significantly more bandwidth than a solid one-color background.
Adequate memory must be allocated in the VM in order to support full-screen use. Total video memory of at least 32MB is recommended.
32MB of memory provides sufficient memory for a 4k display.
Review the settings for Target Resolution for the VM by selecting the VM in the NETLAB+ Virtual Machine inventory. The target resolution should match the value set for the VM’s desktop size.
When a VM is selected by a user during a lab session, the option to Resize Display will be available if the MKS viewer has been selected for the host server and properly configured.
This is particularly helpful to use after entering full-screen mode (select F11 if using Windows) since it will enable users to make use of the entire screen’s “real estate” as the working area.
Be aware that in some cases (depending on the selected OS and other VM settings), the Resize Display option will not function until the user has first performed their initial login to the VM, as per the instructions provided in the lab content.
If the Resize Display option is not available for selection (greyed out) or not functioning as expected, review the items below.
Troubleshooting Checklist – MKS Viewer
Has the option to
Prefer MKS Viewerbeen selected for the host server? This option is available only for ESXi 6. For ESXi version 7 or higher, NETLAB+ will always use MKS.Be aware that the
Prefer MKS Viewersetting will determine which viewer is used, depending on its value at the time of lab initialization. Lab reservations in progress will not reflect a change in viewer selection.Is
VMware Toolsinstalled on the VM?Is the
Total Video Memoryfor the VM set to at least 32MB?Is the lab reservation for a single user (instructor or student)? The Resize Display option is not available in ILT or team reservations.
Has the user completed their initial login into the VM? In some cases (depending on the selected OS and other VM settings), the Resize Display option will only function after the user has performed their initial login to the VM, as per the instructions provided in the lab content.
Proactive Resource Awareness
Proactive Resource Awareness (PRA) allows you to time-share virtualization servers using the NETLAB+ scheduler. PRA is designed with 3 goals in mind.
Ensure a quality lab experience for all trainees by reserving CPU and memory resources on VM servers at the scheduled lab times. This proactively prevents the VM servers from becoming overloaded and unresponsive.
Increase the number of trainees that you can run through your training programs by spreading out the trainee lab sessions over time.
Reduce costs of your training programs by using fewer virtualization servers.
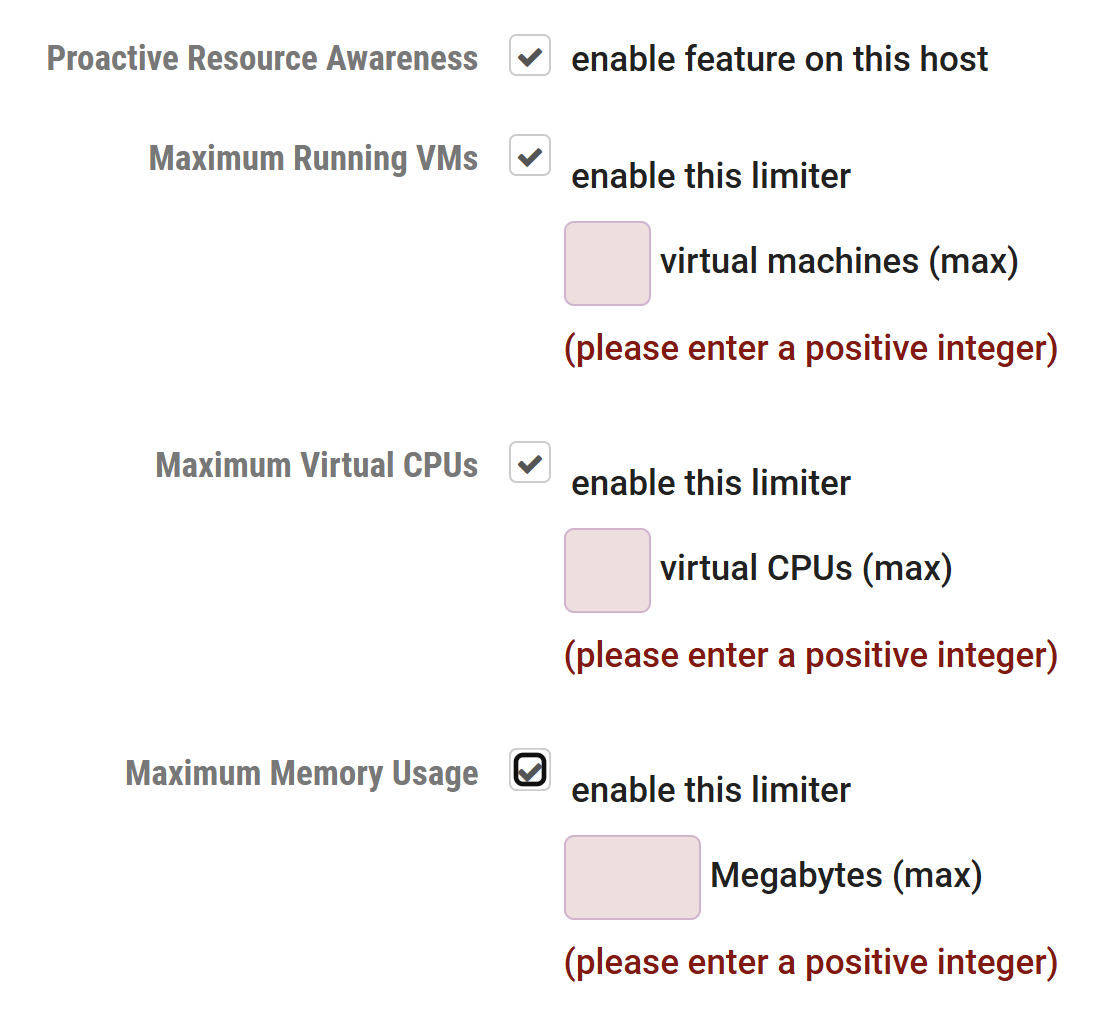
For each VM server in your inventory, you may set 3 limits.
Total number of active virtual machines
Active number of virtual CPUs
Active maximum memory usage
With these limits defined, the scheduler will proactively manage the server’s CPU and memory resources. If scheduling a particular pod would exceed one of the set limits in a 30-minute time slot, the pod cannot be scheduled at that time and the limitation will be clearly indicated on the scheduler.
PRA is enabled in Virtual Machine Host Servers on a per host basis. You can enable PRA when adding a host or editing the host settings of an existing host.
Click on > Virtual Machine Infrastructure > Virtual Machine Host Servers > host name.
Note
The values you set for PRA will depend on your host server specifications and the types of workloads that you run on your servers.
Proactive Resource Awareness is a scheduling algorithm based on workload forecasting; it does not monitor real time workload. PRA assumes that all virtual machines running on a host server are under the control of NETLAB+; it does not account for VMs that are powered on independently of NETLAB+.
Field Descriptions
- Proactive Resource Awareness:
Check this box to enable Proactive Resource Awareness on this host. When enabled, the scheduling system will ensure that the resources on this host are not oversubscribed at any one time based on your maximum resource settings.
- Maximum Running VMs:
The maximum number of virtual machines that can be running on this host at one time.
- Maximum Virtual CPUs:
The maximum number of virtual CPUs that can be running on this host at one time.
- Maximum Memory Usage:
The maximum amount of memory (in Megabytes) that can be allocated by virtual machines on this host. This does not include overhead memory used by the host and/or virtual machines. Examples: 2000 = 2 Gigabytes, 70000 = 70 Gigabytes
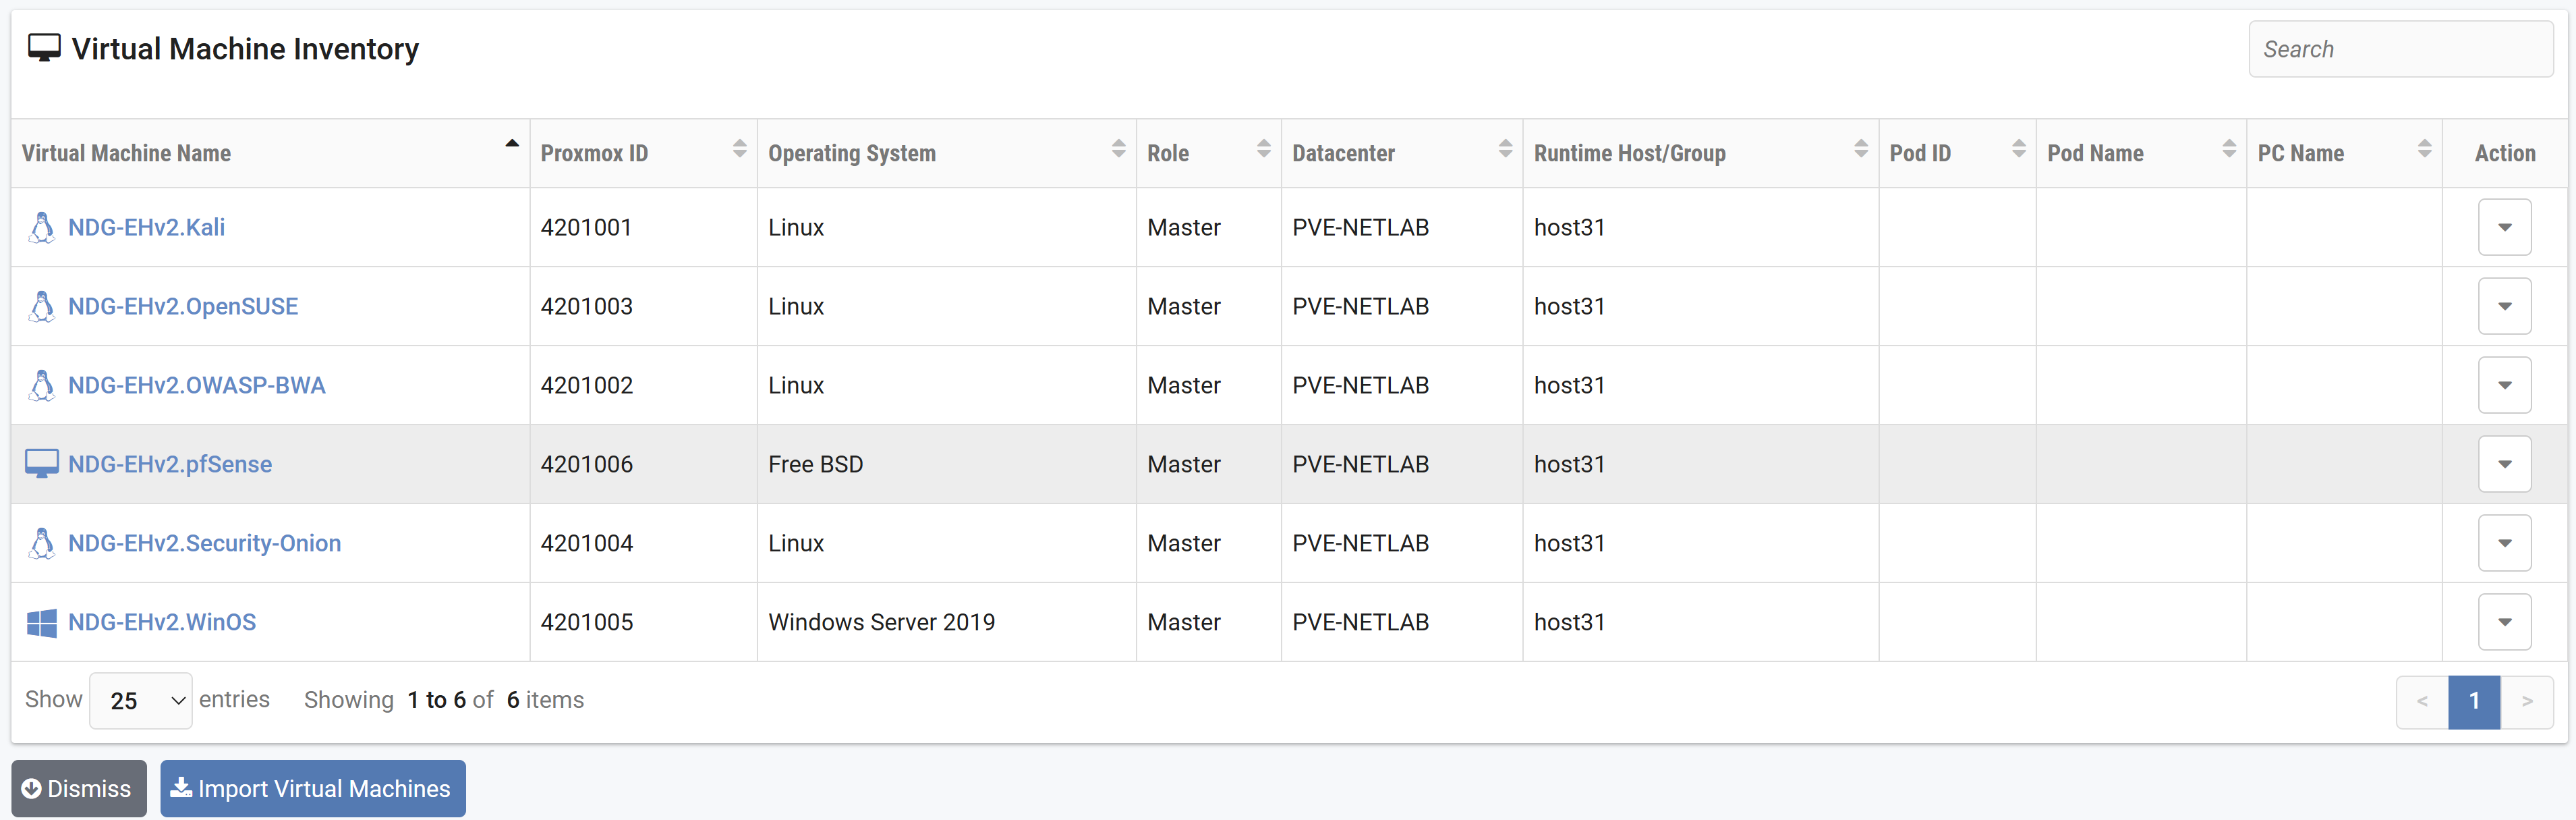
Virtual Machine Inventory
NETLAB+ maintains a database called the Virtual Machine Inventory. The inventory is a mapping between NETLAB+ remote PCs and virtual machines in one or more datacenters. The inventory also tracks information about virtual machines that is not stored in Proxmox VE, such as the role each VM plays in NETLAB+ and parent/child relationships between virtual machines.
The Virtual Machine Inventory allows you to import, clone, and manage the inventory of virtual machines to be used with NETLAB+. The inventory is a mapping between NETLAB+ remote PCs and virtual machines in a single Proxmox VE cluster.
Virtual Machine Roles
::TODO:: Update definitions
Each virtual machine is assigned a role in the NETLAB+ inventory. This is a NETLAB+ specific value that is not stored in Proxmox VE. The role indicates the intended function of the virtual machine in NETLAB+ and influences the operations that can be performed on the virtual machine, as well as default settings during those operations. The following roles are currently defined:
- Template:
A template is a virtual machine that is used to deploy linked clone virtual machines. Templates cannot be powered on or edited.
- Master:
By designating a virtual machine as a master, you indicate your intention to use the virtual machine for the purpose of cloning other virtual machines and/or cloning the virtual machine as part of a template pod. When you clone VMs from a master, and subsequently choose to clone a VM from that clone, the default selection will be to create the clone from the original that was indicated to be the Master. A master VM differs from a template VM in that can be assigned to run on a host, used in a pod (typically a master pod), and powered on for the purpose of adding and configuring new software. Once the virtual machine has all the required software components and is thoroughly tested, a golden master snapshot is taken and becomes the basis for full or linked clones (discussed later).
- Normal:
A normal VM is a virtual machine that will be assigned to a production pod. A normal VM may be configured to revert to a snapshot at the beginning and end of a lab reservation, or when the user explicitly invokes the scrub action on the VM or the entire pod. A normal VM is an ideal choice for pods that should always start in the same state, such as VMs in Cisco NetAcad pods.
- Persistent:
A persistent VM is assigned to a production pod, with the additional characteristic that its state will be retained from one reservation to the next. A persistent VM does not automatically revert to a snapshot. This type of VM is appropriate when the user assigned to the pod is working on a curriculum that carries the result of each lab assignment progressively. An example scenario would be a course where the student performs “Lab One” and then on a subsequent reservation performs “Lab Two”, with the pod in the state it was in at the end of “Lab One”. As of version 25.1.0, administrators can manually manage snapshots on persistent VMs using the Snapshot Manager.
How Virtual Machines Become Part of the NETLAB+ Inventory
Virtual machines must first reside in the NETLAB+ Virtual Machine Inventory before they can be assigned to pods and function as NETLAB+ remote PCs. There are three ways virtual machines can become part of the NETLAB+ inventory:
- Import:
NETLAB+ communicates with Proxmox VE and scans the selected datacenter to identify existing VMs that are available to be added to the NETLAB+ virtual machine inventory. The import function is used to import virtual machines that were created outside of NETLAB+.
- Clone VM:
NETLAB+ communicates with Proxmox VE and makes a copy of a virtual machine that already exists in the NETLAB+ inventory. When a virtual machine is cloned from the NETLAB+ inventory, the new virtual machine is added to both the NETLAB+ inventory and Proxmox VE in one operation. NETLAB+ also supports linked clones (virtual machines that share disk content with another parent virtual machine).
- Clone Pod:
If a pod contains only virtual machines, NETLAB+ can clone the entire pod in one operation. Each virtual machine in the source pod is cloned and added to both the NETLAB+ inventory and Proxmox VE in one operation.
Importing VMs into the Virtual Machine Inventory
The following procedure is used to import an existing virtual machine or template from Proxmox VE into the NETLAB+ Virtual Machine Inventory.
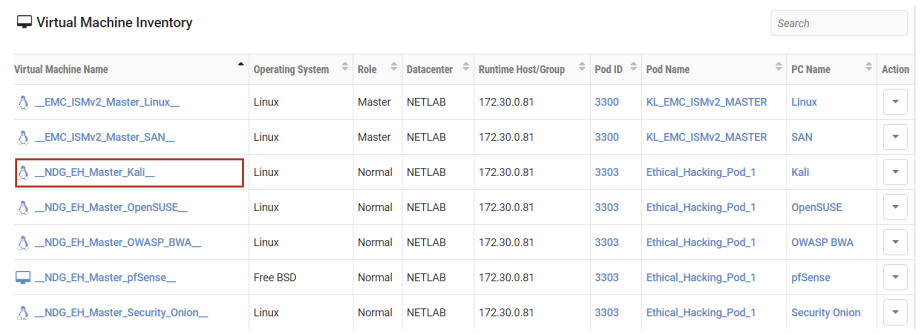
From the Virtual Machine Infrastructure administrator page, select Virtual Machine Inventory. All virtual machines in the inventory are listed. If this is your
first time importing VMs to the inventory, there is no list displayed.
Click the Import Virtual Machines button at the bottom of the page to add VMs
to the inventory.
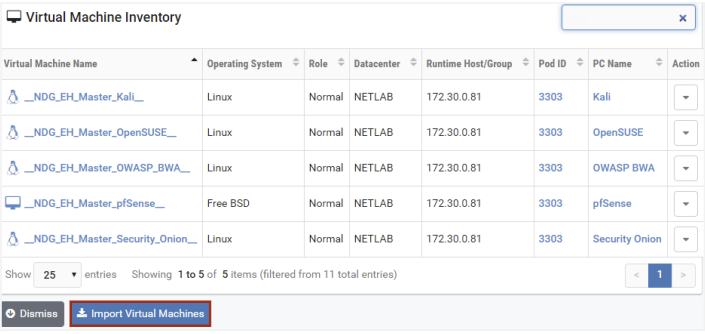
NETLAB+ will scan the datacenter to discover virtual machines that are not
currently in the inventory. You may then click the checkbox next to the virtual
machine(s) you wish to import (see the box below for tips on selection) and then
click Import Selected Virtual Machines.
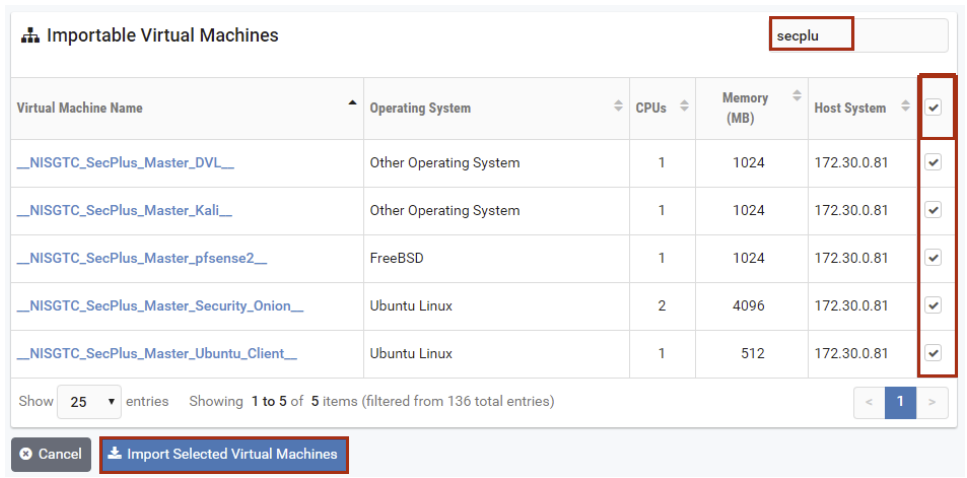
Note
NETLAB+ provides several tools that can make selecting virtual machines more convenient, particularly when dealing with a long list. In the example below, a partial name “secplu” (for security plus) was entered in the search box to filter the list of virtual machines displayed. The checkbox at the top of the last column was selected, which functions as a “select all”, resulting in all of the virtual machines displayed being selected for import.
Select the appropriate configuration settings for each virtual machine (refer to
the field descriptions below) and then click Import Virtual Machines. The VMs
will be added to the Virtual Machine Inventory.
Field Descriptions - Configure VMs
- Operating System:
This should match the operating system installed on the virtual machine. The default value is usually correct.
- Role:
Select the role that this virtual machine will play in your inventory. If the virtual machine is marked as a
Templatein Proxmox VE, it will also be set toTemplatein NETLAB+ (no selection is provided in this case).- Runtime Host/Group:
Select the physical Proxmox VE host that will run the virtual machine.
- Comments:
Add any additional information to help identify the VM and its intended use.
Editing Details of a Virtual Machine in the Inventory
To edit the details of a VM in the Virtual Machine Inventory, follow the steps below.
From the Virtual Machine Infrastructure administrator page, select Virtual Machine Inventory. All virtual machines in the inventory are listed.
To view the details for a VM, click on a Virtual Machine Name.
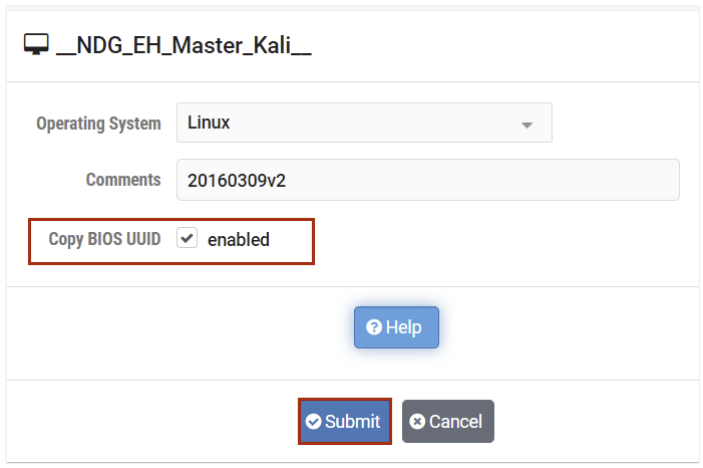
The details of the VM are displayed. Select the Edit button.
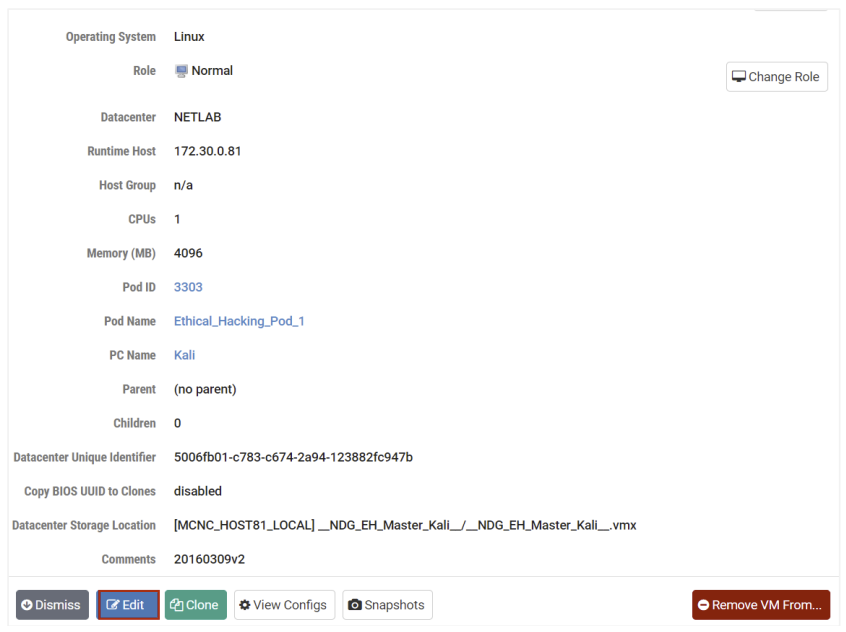
The VM settings that may be edited are displayed; please see the Field
Descriptions below. In the example below, we have enabled the Copy BIOS UUID
by selecting the checkbox. Click Submit.
Field Descriptions - VM Edit Page
- Operating System:
This should match the operating system installed on the virtual machine. The default value is usually correct.
- Comments:
Add any additional information to help identify the VM and its intended use.
- Target Resolution:
The native resolution that the VM was designed for and the resolution that will be used when multiple users are sharing the same lab reservation. Note that the VM must have enough video memory to supported the target resolution. The resolution fields must not be empty and may only contain digits.
- Copy BIOS UUID:
If the checkbox is checked (enabled), this VM’s BIOS UUID will be copied to any VM cloned from this VM (see the next section for details on VM cloning).
Cloning a Virtual Machine in the Inventory
Cloning virtual machines can save you a substantial amount of setup time if you are deploying many similar virtual machines. A clone is a copy of a virtual machine. Cloning a virtual machine creates a copy of a virtual machine, including its settings, any configured virtual devices, installed software, and other contents of the virtual machine’s disks. You can create, configure and install software on a single virtual machine, and then clone it multiple times.
After a virtual machine is cloned, the clone can be modified as needed. For example, you may wish to change the IP address or client name on several cloned virtual machines. If there is a particular virtual machine configuration that you will want to clone many times, a good strategy is to create a master VM. A master VM can be part of a pod and can be powered on.
NETLAB+ can create linked clones or full clones.
A linked clone (or linked virtual machine) is a virtual machine that shares virtual disks with the parent (or master)
virtual machine in an ongoing manner. This conserves disk space and allows multiple virtual machines to use the same
software installation. Linked clones can be created very quickly because most of the disk is shared with the parent VM.
A full clone is an independent copy of a virtual machine that shares nothing with the parent virtual machine after the
cloning operation. The ongoing operation of a full clone is entirely separate from the parent virtual machine.
NETLAB+ provides a convenient way to clone virtual machines. In order to clone virtual machines within NETLAB+, you must first create a source virtual machine to be used as the source for the clone. The source virtual machine must also be registered in the NETLAB+ inventory.
To clone a virtual machine, select the source virtual machine to be cloned in the NETLAB+ Virtual Machine Inventory. In this example, we have selected a virtual machine that has been designated as a master.
Begin the cloning process by selecting the Clone button.
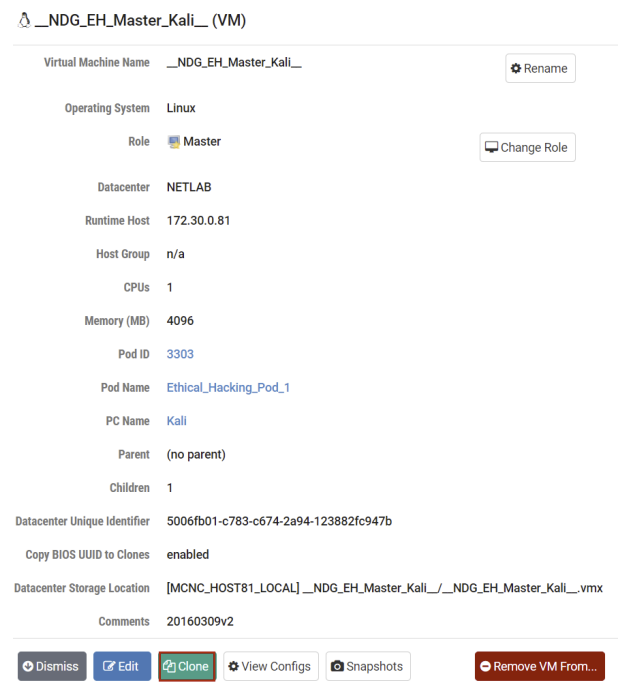
The Clone Virtual Machine page will be displayed. Select the appropriate
settings for the fields (see field descriptions below) and then select Clone.
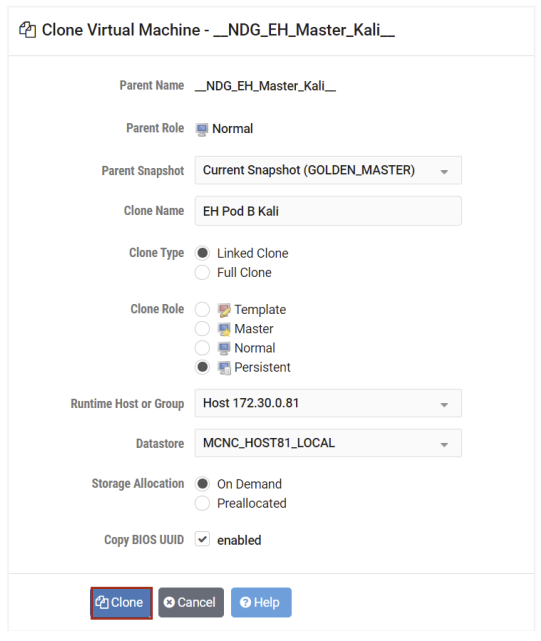
Field Descriptions - Clone Virtual Machine
- Parent Name:
The name of the existing parent virtual machine. In this example, we are making a clone of a virtual machine designated as a master. This master is the parent of the virtual machine.
- Parent Role:
The role the parent virtual machine plays in the inventory.
- Parent Snapshot:
A snapshot name on the parent virtual machine from which to base the clone. If this parameter is set, the clone is based on the snapshot point. This means that the newly created virtual machine will have the same configuration as the virtual machine at the time the snapshot was taken. If this property is not set, the clone is based on the virtual machine’s current configuration.
- Clone Name:
The name of the new virtual machine.
- Clone Type:
There are two types of clones:
Linked Clone: A copy of a virtual machine that shares virtual disks with the parent virtual machine in an ongoing manner. This conserves disk space and allows multiple virtual machines to use the same software installation. Linked clones can be created very quickly because most of the disk is shared with the parent VM. In Proxmox VE, this can only be created from a Template VM.
Full Clone: An independent copy of a virtual machine that shares nothing with the parent virtual machine after the cloning operation. The ongoing operation of a full clone is entirely separate from the parent virtual machine.
- Clone Role:
Assign the clone to the role it will play in the inventory.
Template: A pristine virtual machine image used as the basis for cloning many virtual machines. Template VMs cannot be powered on or modified.
Master: A virtual machine used as the basis for cloning other virtual machines. Master VMs can be assigned to pods, modified, and powered on.
Normal: A virtual machine that can be assigned to a pod. A normal VM will typically revert to a specified snapshot at the start of a lab reservation.
Persistent: A virtual machine that can be assigned to a pod and retains its state between labs. A persistent VM is typically used in conjunction with Pod Assigner to create long-term personal pods.
- Runtime Host or Group:
The host server where the virtual machine will run.
- Datastore:
The datastore that will contain the new VM’s virtual disk files.
- Storage Allocation:
Indicate the type of storage allocation to be used for the virtual machine.
On Demand allocates storage for the new virtual machine as needed; this favors storage reduction at the expense of decreased write performance.
Preallocated allocates all storage for the new virtual machine in advance; this favors better write performance at the expense of increased storage.
- Copy BIOS UUID:
If the checkbox is checked (enabled), this VM’s BIOS UUID will be copied to any VM cloned from this VM.
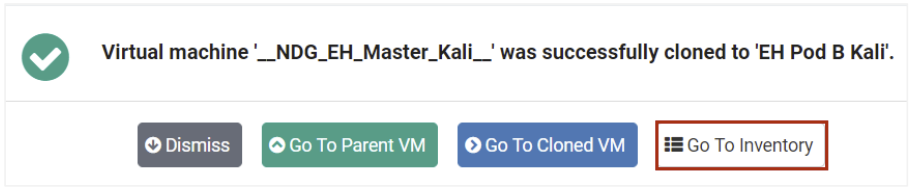
The results of the cloning process will be displayed. To return to the inventory,
select Go To Inventory.
Viewing Configs of a VM in the Inventory
Warning
This feature is not available with Proxmox VE at this time.
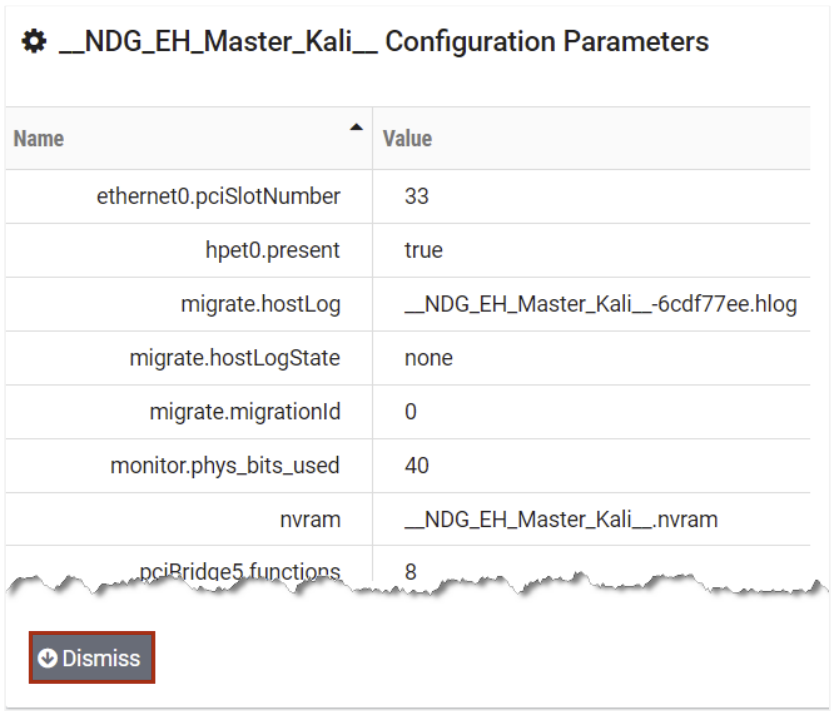
Follow the steps below to view the .vmx settings for any VM in the Virtual Machine Inventory.
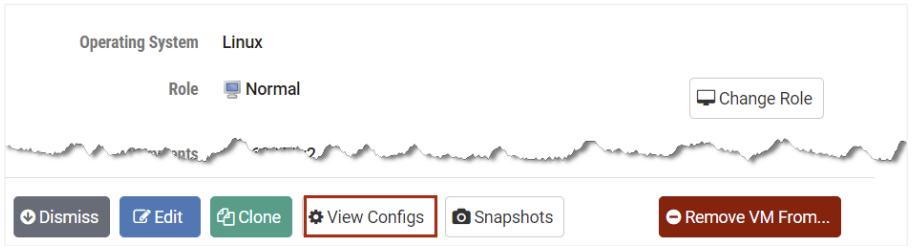
Select a virtual machine in the Virtual Machine Inventory to display the details of the VM.
Select the View Configs button.
The configuration parameters for the VM will be displayed. When you are
finished viewing the information, click Dismiss.
Managing Snapshots for a VM in the Inventory
The Snapshot Manager allows you to manage snapshots for virtual machines in the inventory. As of version 25.1.0, the Snapshot Manager supports persistent VMs in addition to normal and master VMs — you can add, remove, and revert snapshots on persistent VMs directly from NETLAB+ without needing to access Proxmox or VMware.
Follow the steps below to access the Snapshot Manager for any VM in the virtual machine inventory.
Select a virtual machine in the Virtual Machine Inventory to display the details of the VM.
Select the Snapshots button.

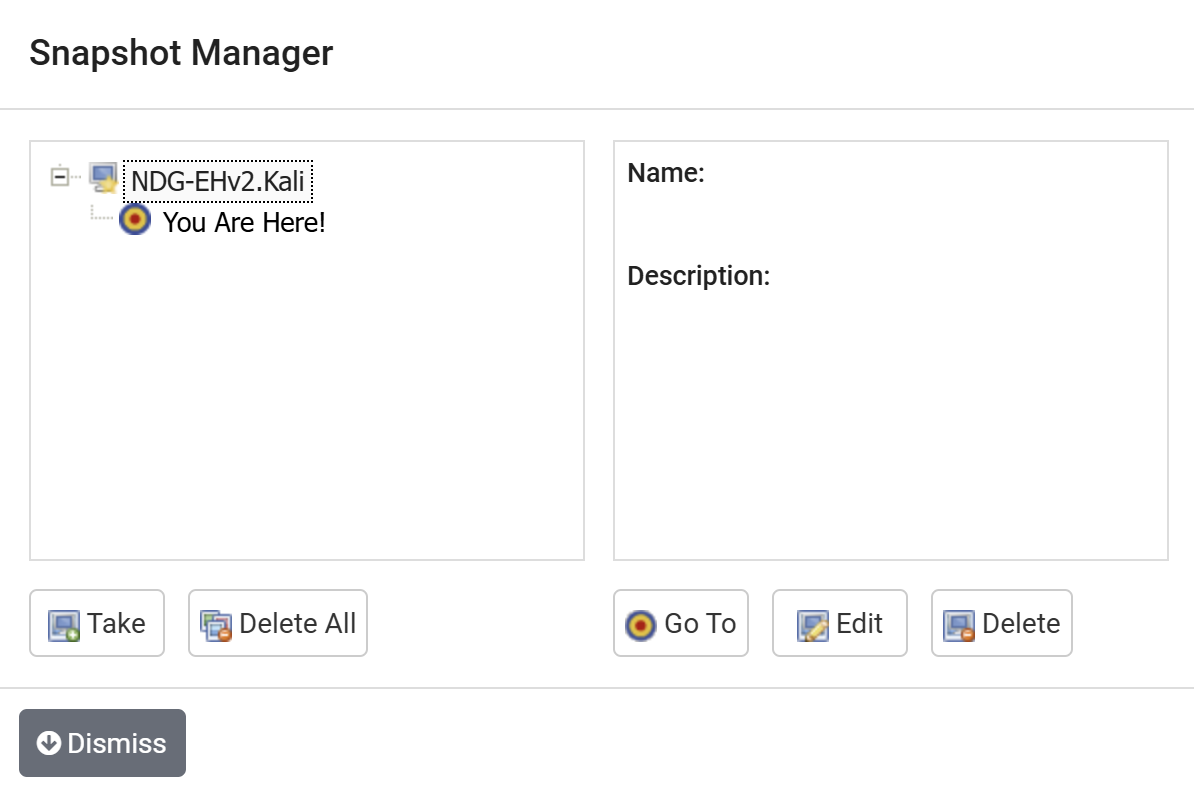
The Snapshot Manager will be displayed.
Take Snapshot
Click on the Take button.
In the Take Snapshot window, fill out the information as necessary. Note the recommended Name is GOLDEN.
Click on OK.
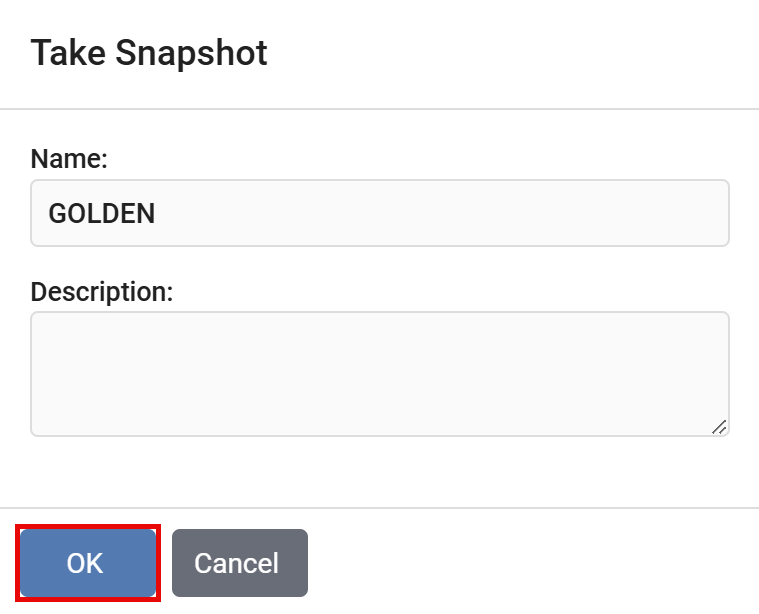
Click the Dismiss button.
Managing Snapshots - Using the NETLAB+ Snapshot Manager
The NETLAB+ Snapshot Manager can be used to manage snapshots of your virtual machines. Using the NETLAB+ Snapshot Manager offers a much more convenient approach for managing your VMs, since it is available within the NETLAB+ Virtual Machine Inventory environment.
In this example, we see that three snapshots have been taken of a virtual machine (after installing the guest operating system, after configuring the remote display commands, and after installing an application).
Be aware of the features available using the Snapshot Manager.
The You Are Here icon represents the current operational state of the virtual machine. Each time you take a new snapshot, the Current Snapshot state is updated. NETLAB+ will revert to the current snapshot.
Take, as described in the previous section, is used to take a new snapshot of the virtual machine.Deletecommits the snapshot data to the parent and removes the selected snapshot.Delete Allwill consolidate and remove all snapshots for this virtual machine. All the snapshots will be consolidated to a single disk.Go Toallows you to select the position of the current operational state of the virtual machine. You may maintain multiple snapshots and control which snapshot NETLAB+ will use by usingGo Toin order to modify the position ofYou Are Here, which indicates the current operational state of the VM.
Virtual Machine Server Licenses
This option is used to view virtual machine server licenses and check expiration dates. In some cases, it may be necessary to refresh NETLAB+’s local data for VM datacenters and managed hosts.
Warning
This does not currently apply to Proxmox VE. This feature may be supported in the future for enterprise licenses.
Refreshing license expirations allows the administrator to update NETLAB+s view of hosts and datacenters for any reason (for example, an ESXi OS update).
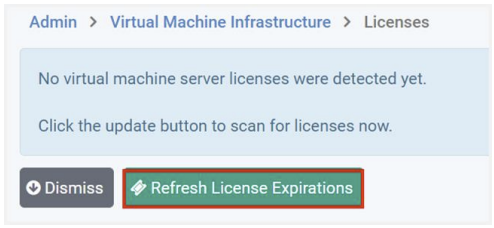
Go to > Virtual Machine Infrastructure > Licenses.
Select the Refresh License Expirations button.
Review the licensing information shown in the virtual machine inventory to verify the licensing information is now up to date.
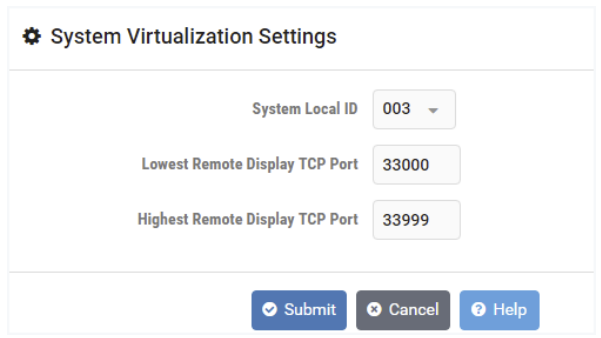
System-wide Virtualization Settings
Warning
NETLAB+ does not currently support connecting multiple NETLAB+ systems to the same Proxmox VE cluster.
View and update system-wide virtualization settings. These settings are changed when deploying multiple NETLAB+ systems that share a common Virtual Machine Infrastructure.
Note
Typically, you should use the default settings unless your VMI is shared with multiple NETLAB+ systems.