Deploy NETLAB+ VM to Proxmox VE
This section will walk you through deploying your NETLAB+ Appliance VM from the NDG VM Distribution System.
Tip
Please refer to the installation and configuration instructions provided in Virtual Machine Infrastructure for details on installing the Proxmox VE management server.
Warning
Do NOT install the Qemu Guest Agent on the NETLAB+ virtual machine. NETLAB+ includes a modified version of Qemu Guest Agent pre-installed.
Before continuing, confirm you have set up the NDG VM Distribution System storage connection to vmdist.netlab by following the instructions at Setup vmdist.netlab Connection.
Deploy NDG NETLAB+ VE
Using your navigation panels, in the Resource Tree, navigate to Datacenter > mgmt_server > vmdist.netlab. In the Content Panel, select Backups.
In the Notes column, select the name NDG-NETLAB-VE (build).
Warning
These build numbers may vary. Please refer to the Release Notes to determine the latest version.
Click the Restore button.
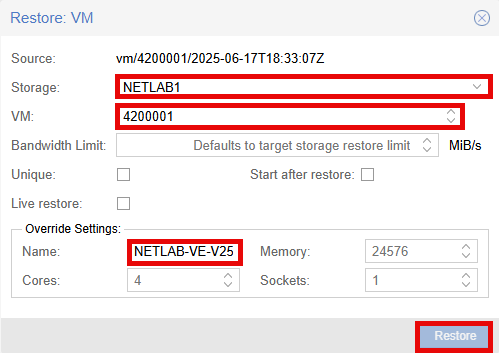
In the Restore: VM popup window, select your storage, i.e. NETLAB1.
Set the VM field to 4200001.
Under the Override Settings section, in the Name field, type NETLAB-VE-V25.
Confirm the settings are correct and click the Restore button.
When the Task viewer popup shows TASK OK you can close the window.
Post Deployment Settings
Using your navigation panels, in the Resource Tree, navigate to Datacenter > mgmt_server > NETLAB-VE-V25. In the Content Panel, select Hardware.
Set Management Network
Note
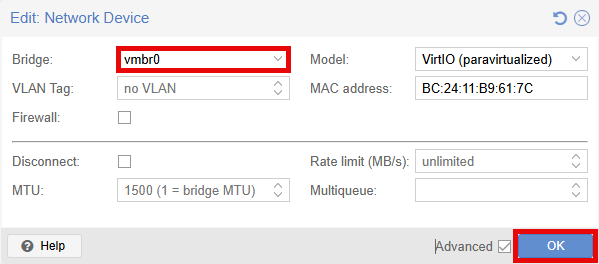
net0 is the primary network adapter, which connects to your campus LAN. In Proxmox VE, this is named vmbr0 by default. During deployment this is set to SAFETY_NET by default.
Select Network Device (net0) and click the Edit button.
Set the Bridge field to your campus LAN such as vmbr0.
Click the OK button.
Set NETLAB+ Control Network
Note
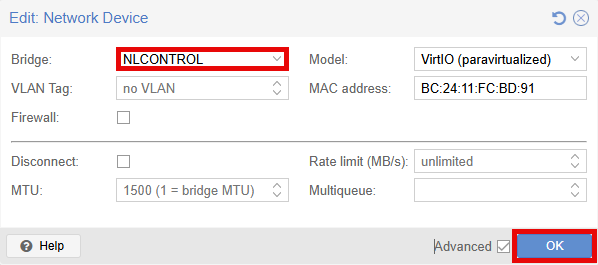
net1 is used in setups that include physical lab devices.
Please refer to the NETLAB+ VE Real Equipment Pod Installation Guide
for Cisco Networking Academy.
Select Network Device (net1) and click the Edit button.
Set the Bridge to NLCONTROL.
Click the OK button.
Set Options
In the Content Panel, select Options.
Confirm Start at boot is set to Yes.
If not, click Start at boot > Edit button > Click the checkbox for Start at boot > OK.
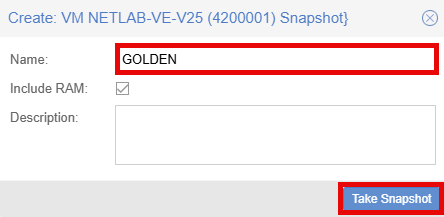
Take Initial Snapshot
In the Content Panel, select Snapshots.
Click the Take Snapshot button.
Enter GOLDEN in the Name field.
Click the Take Snapshot button.
When the Task viewer popup shows TASK OK you can close the window.