Master Pod Configuration
A master pod is setup on the management server. This master pod will contain the VMs deployed from the NDG VM Distribution System. This will later be cloned to template pods on each host.
NDG VMDIST Storage Connections
These storage connections should be set up and configured on your management server. Refer to Setup NDG VM Distribution System
PC Name |
VM OS |
VM ID |
VMDIST VM Name |
VMDIST Storage Connection |
|---|---|---|---|---|
Workbench |
Linux |
4211031 |
Cisco-PTv8.Workbench (build) |
vmdist.cisco |
PodRouter |
Linux |
4211032 |
Cisco-PTv8.PodRouter (build) |
vmdist.cisco |
Deploying from NDG VMDIST
Deploy on your management server the pod virtual machine files from the NDG VM Distribution System.
Navigate to your Proxmox VE Management Server using your management workstation in a web browser.
Using your navigation panels, navigate to Resource Tree > Datacenter > your_management_server > vmdist.ndg_genit.
In the Content Panel, select Backups.
In the Notes column, select the name Cisco-PTv8.Workbench.
Note
These build numbers may vary. Please refer to the Release Notes of the content to determine the latest version.
Click the Restore button.
In the Restore: VM popup window, select your Storage (i.e. NETLAB1).
Set the VM field to 4211031.
Click the Restore.
Proxmox VE will begin deploying the virtual machine. This may take some time, depending on the speed of your connection, HDDs, etc. Repeat the previous steps for each remaining virtual machine in the pod from the table above.
Modify Virtual Machines
Once the virtual machines are imported onto the management host, verify the configurations. The following steps will guide you through the process.
Navigate to your Proxmox VE cluster using your management workstation, and login.
Using your navigation panels, navigate to Resource Tree >
Datacenter > your_management_server. Expand its view to see the virtual machines you deployed.
Locate the Cisco-PTv8.Workbench virtual machine. In the Content Panel, select Hardware.
Select Network Device (net0) and click the Edit button.
Confirm the MAC address field matches the table below.
Virtual Machine |
NIC |
MAC |
|---|---|---|
Workbench |
0 |
00:50:56:99:d0:99 |
PodRouter |
0 |
(randomly generated) |
1 |
00:50:56:99:2d:2f |
Repeat the previous steps for each network adapter of the remaining virtual machines you deployed.
Create a Snapshot
Locate the Cisco-PTv8.Workbench virtual machine. In the Content Panel, select Snapshots.
Click the Take Snapshot button.
In the Create Snapshot window, type GOLDEN. Click Take Snapshot to take a snapshot.
Repeat these steps for each virtual machine.
NETLAB+ Virtual Machine Inventory Setup
This section will guide you in adding your master virtual machines to the Virtual Machine Inventory of your NETLAB+ VE system.
Log in to your NETLAB+ VE system using the administrator account.
Select the Virtual Machine Infrastructure icon.
Click the Virtual Machine Inventory icon.

Click the Import Virtual Machines button located at the bottom of the list.

Select the appropriate datacenter from the list where your VMs reside.
Select the checkbox next to the virtual machines you have just deployed and click Import Selected Virtual Machines.

When the Configure VMs window loads, you can set your virtual machine parameters.
Note
It is advised to leave the Version and Build numbers for reference when requesting NDG support.
Check the dropdown box for the correct operating system for each imported virtual machine.
Change
RoletoMasterfor each VM.Add any comments for each virtual machine in the last column.
Verify your settings and click
Import (X) Virtual Machines(notice the number in parenthesis is dynamic, depending on the amount of VMs selected).Verify all
Import Statusesreport back withOKand then click on theDismissbutton.Verify that your virtual machines show up in the inventory.
For additional information, please refer to the NETLAB+ VE Administrator Guide.
Building the Master Cisco Packet Tracer - v8 Pod
This section will assist you in adding the Cisco Packet Tracer - v8 pod to your NETLAB+ system.
Enabling Labs in Course Manager
Please refer to the Course Manager section of the NETLAB+ VE Administrator Guide on how to enable content. Please install the Cisco Packet Tracer - v8 course.
Create the Master Pod
Log into NETLAB+ VE with the administrator account.
Select the Pods icon.

Create a new pod by scrolling to the bottom and clicking the Create New Pod button.
Then, click on the Cisco Packet Tracer - v8 pod entry from the list of installed pod types.

On the New Pod window, input a value into the Pod ID and Pod Name fields. Click Next.
Note
The Pod ID determines the order in which the pods will appear in the scheduler. It is best practice to use a block of
sequential ID numbers for the Pod Id that allows for the number of pods you are going to install.
The Pod Name identifies the pod and is unique per pod. Here we used the name of the lab set or course in a shortened form.
To finalize the wizard, click OK.
For additional information, please refer to the NETLAB+ VE Administrator Guide.
Attach Virtual Machines to the Master Pod
Update the master pod to associate the virtual machines with the newly created pod.
Select the Cisco Packet Tracer - v8 master pod from the pod list.
Click on the Action dropdown next to the virtual machine you are about to assign and select Attach VM.
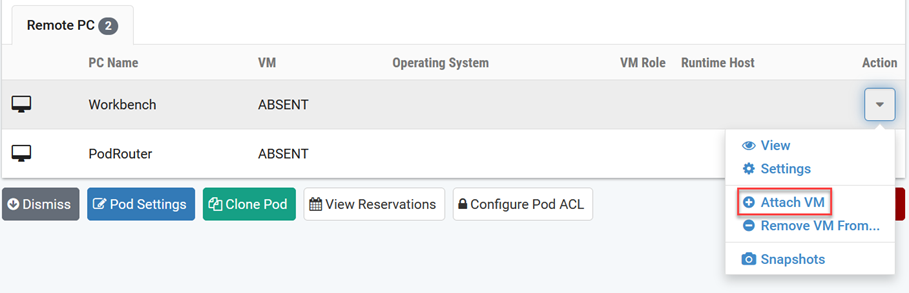
Select the corresponding virtual machine from the inventory list.
Click OK to confirm the VM attachment and repeat the previous steps for the remaining virtual machines.
Set the Revert to Snapshot
Make sure to view the Cisco Packet Tracer - v8 master pod you just created snapshots for. In the pod view,
click on the dropdown menu option underneath the Action column and select Settings.
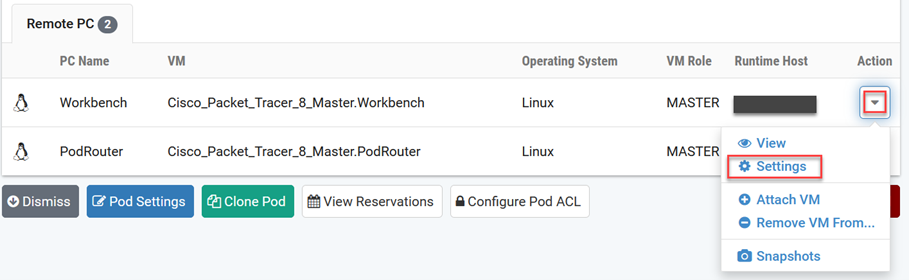
In the virtual machine’s Settings window, click on the Revert to Snapshot dropdown and select GOLDEN and then click the Submit button.
Note
This sets the snapshot on the virtual machine that will get reverted to each time the pod is scheduled.
Click OK to confirm.
Return to the pod view page and repeat the previous steps for the remaining virtual machines.