Import NETLAB+ VM to Proxmox VE
This section will walk you through importing your NETLAB+ Appliance VM from VMWare ESXi to Proxmox VE. This guide should only be followed when migrating from a VMWare infrastructure to Proxmox VE.
Note
In this example, the PVE server is host22. The ESXi management host we are transferring from is host10. You will connect directly to the ESXi host, NOT the vCenter Server.
Prepare NETLAB+ VM
Confirm your NETLAB+ VM is running Software Version 24.1.0 by navigating to > Software Version. Please contact NDG Support if unable to upgrade.
Collect the following information from NDG Support:
NETLAB+ License Key
NETLAB+ Serial Number
NDG VM Distribution System Username and Password
Activation count set to 5
Shutdown NETLAB+ VM
Properly shutdown the NETLAB+ Appliance by navigating to > Shutdown/Reboot.
Click the Shutdown button to begin shutdown.
Click the Shutdown Now button to confirm shutdown.
Danger
Do not turn on your NETLAB+ Appliance again at this point. This can cause reactivation events.
Confirm Network Adapter Settings
In this section we want to confirm the first network adapter is set to manual and we have a record of the MAC address.
Navigate to your VMware vCenter Server system and login via web browser.
Under your Management Server, right-click on your NETLAB+ VM and select Edit Settings.
Click the dropdown for Network adapter 1.
Write down the MAC Address as you will need it later. Double-click the address to highlight it and press CTRL-C to copy it to your clipboard.
Danger
Make sure you have this MAC address written down as it will disappear in the next step. Failure to maintain this address will result in a forced reactivation which may cause problems with your NETLAB+ appliance.
Set this adapter to Manual. You will notice half of the MAC Address is removed. Use CTRL-V to paste in the full address or manually type it back in.
Click the OK button to continue.
Create a Full Clone of NETLAB+ VM
In this section you will create a full clone of the NETLAB+ VM. This allows your original NETLAB+ VM running software version 24.1.0 to remain on your ESXi infrastructure in the event you need to revert back.
Navigate to your VMware vCenter Server system and login via web browser.
Under your Management Server, right-click on your NETLAB+ VM and select Clone > Clone to Virtual Machine....
On the Select a name and folder page, set the Virtual machine name to NETLAB_VE_V24_PROXMOX. Click the NEXT button.
On the Select a compute resource page, select your management server. Click the NEXT button.
On the Select storage page, click the radio button next to your desired storage location. Make sure it has ample storage space available.
On the Select virtual disk format dropdown, select Thin Provision. Click the NEXT button.
On the Select clone options page, leave all boxes unchecked. Click the NEXT button.
On the Ready to complete page, click the FINISH button.
This will take some time depending on your hardware resources. When it is complete, DO NOT TAKE A SNAPSHOT. The Proxmox Import Tool requires there are no snapshots.
Setup ESXi datastore
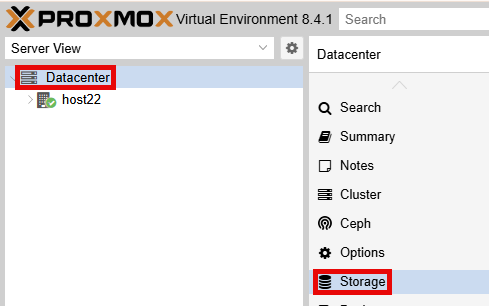
Using your navigation panels, in the Resource Tree, navigate to Datacenter. In the Content Panel, select Storage.
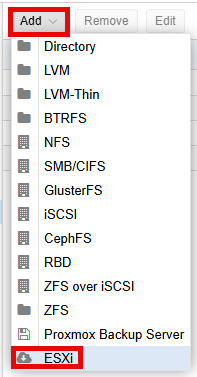
Click the Add > ESXi.
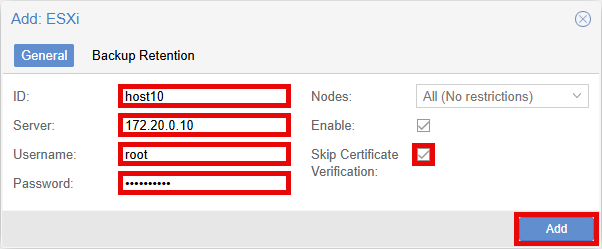
In the Add: ESXi popup window, enter an ID in the ID field. This is temporary while importing NETLAB+ and will be removed when completed.
Danger
The following steps are asking for your ESXi management server credentials, NOT your VMware vCenter Server credentials.
Enter the IP Address of your ESXi management host server in the Server field.
Enter your username of your ESXi management host server in the Username field.
Enter your password of your ESXi management host server in the Password field.
Click the checkbox for the Skip Certificate Verification field.
Confirm the settings are correct and click the Add button.
To confirm connectivity, using your navigation panels, in the Resource Tree, navigate to Datacenter > your_server. In the Content Panel, select Virtual Guests.
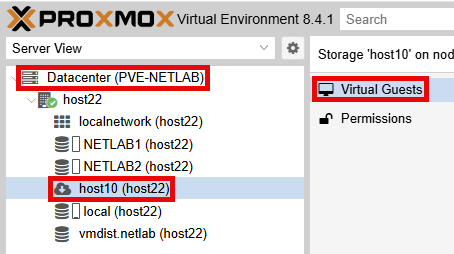
Confirm the NETLAB_VE_V24_PROXMOX virtual machine is listed before continuing.
Import NETLAB+ VM
In the Virtual Guests pane, select the NETLAB_VE_V24_PROXMOX virtual machine.
Click the Import button.
In the Import Guest popup, enter 4200001 in the VM ID field.
Set the Name field to NETLAB_VE_V25.
Confirm Sockets are set to 1.
Confirm Cores are set to 4.
Set the CPU Type field to host.
Confirm the Default Storage field is set to NETLAB1.
Set the Default Bridge field to SAFETY_NET.
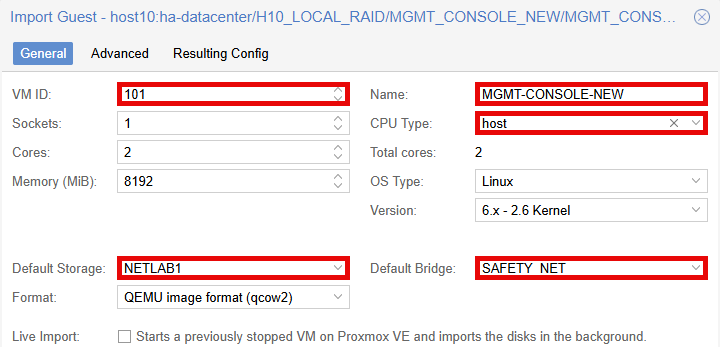
Click on the Advanced tab.
Set the SCSI Controller field to VirtIO SCSI single.
For each Network Interface, set the Model field to VirtIO (paravirtualized).
Confirm the settings are correct and click the Import button.
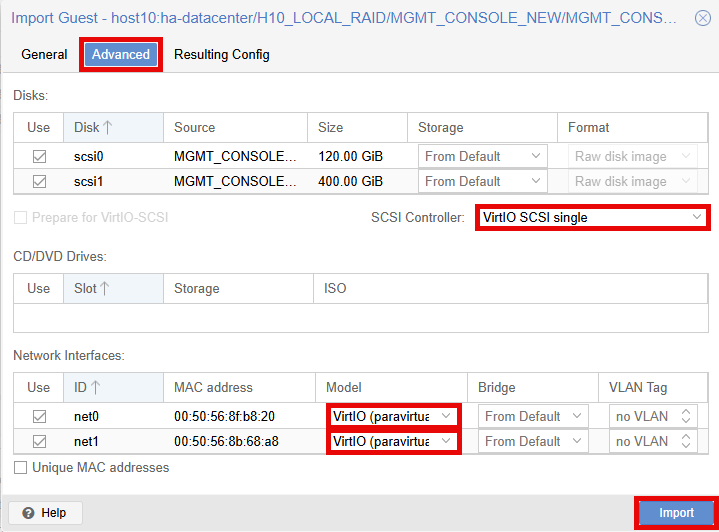
Click on the Resulting tab.
Depending on the size of the VM and the network speed, this may take several minutes.
Post Import Settings
Using your navigation panels, in the Resource Tree, navigate to Datacenter > your_server > NETLAB_VE_V25. In the Content Panel, select Hardware.
Modify Disks
Click on Hard Disk (scsi0) > Edit button.
In the Edit: Hard Disk (scsi0) popup window, click the checkbox for Discard and IO thread.
Click the OK button.
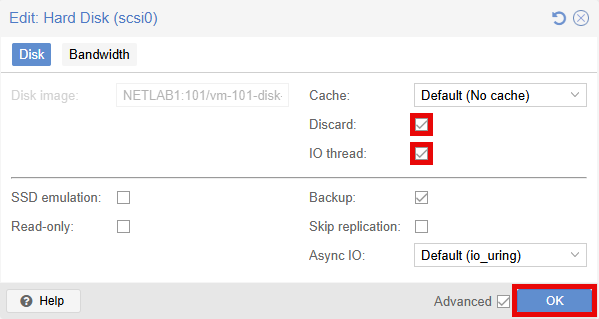
Repeat these steps for each disk on the VM.
Set Management Network
Click on Network Device(net0) > Edit button.
Set the Bridge field to your management network i.e. vmbr0 by default.
Confirm the MAC Address matches the address your wrote down in Confirm Network Adapter Settings.
Click the OK button.
Click on Network Device(net1) > Edit button.
Set the Bridge field to NLCONTROL.
Click the OK button.
Confirm Network Device(net2) and Network Device(net3) have the bridge set to SAFETY_NET.
Set Options
In the Content Panel, select Options.
Click on Start at boot Edit button and adjust.
Click the checkbox for Start at boot then click the OK button.
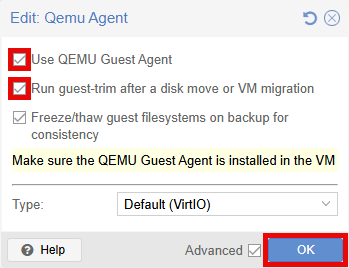
Click on QEMU Guest Agent > Edit button and adjust.
In the Edit: Qemu Agent popup window, click the checkbox for Use QEMU Guest Agent.
Click the checkbox for Run guest-trim after a disk move or VM migration.
Click the OK button.
Take Initial Snapshot
In the Content Panel, select Snapshots.
Click the Take Snapshot button.
Enter GOLDEN in the Name field.
Click the Take Snapshot button.
When the Task viewer popup shows TASK OK you can close the window.
Power On NETLAB+
Right-click the NETLAB-VE-V25 in the Resource Tree.
Select Start.
Confirm the NETLAB-VE-V25 is highlighted and click the >_Console in the upper right hand corner.
Watch the virtual machine boot. After loading, you should be presented with the NDG login banner prompting you for the administrator password. You do not need to login here.
Upgrade to Software Version 25.0.0
Danger
Contact NDG Support to confirm your system has been set for upgrade to 25.0.0 before continuing.
Browse to your NETLAB+ login page and login as administrator.
Navigate to > Software Updates.
Click the Check for Updates button.
Click the Update button.
Allow the system to upgrade and reboot. Then confirm the Software Version on the page is set to version 25.0.0.
Take Updated Snapshot
Browse to your Proxmox VE management server.
Click the NETLAB_VE_V25 virtual machine in the Resource Tree.
In the Content Panel, select Snapshots.
Click the GOLDEN snapshot. Then click the Remove button.
In the Confirm window, click the Yes button.
Click the Take Snapshot button.
Enter GOLDEN in the Name field.
Click the Take Snapshot button.
When the Task viewer popup shows TASK OK you can close the window.
Remove ESXi datastore
Using your navigation panels, in the Resource Tree, navigate to Datacenter. In the Content Panel, select Storage.
Click the storage your created in Setup ESXi datastore.
Click the Remove button.
Follow the prompts to remove the datastore.